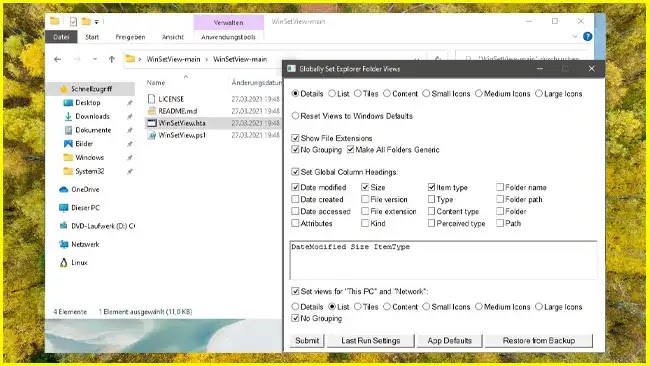
The folder view under Windows 10 is divided up differently. If you would like to have a uniform view, you have to work your way through the settings in File Explorer. This can be done quickly with WinSetView with a few "clicks".
WinSetView is a PowerShell script with a graphical user interface. With a double click on WinSetView.hta you start the GUI. This is divided once for the general folder and once for "This PC" and "Network".
Here you can choose how the folder view should look like. You can choose between details, lists of icons. Whether the file name extension should be displayed. (Which should actually always be switched on for security reasons) .
Whether a grouping, as the download folder, has recently activated or deactivated and which information should be displayed in the folder. In addition, you can either exclude “This PC” and “Networks” from the settings or set them separately.
If you have set everything so far, click on "Submit" and the settings will be entered in the registry. The desktop goes dark for a moment and the explorer.exe is restarted. If you now open the folders, they are as you had set them in advance.
If you made the wrong settings, you can restart WinSetView.hta and click on "Restore from Backup". Then the changes will be rolled back. Because before the changes are made, the little tool has created a backup of the registry entries.
If you have already started several attempts, use "Restore from Backup". Select the reg file and click on "Open". Also now the explorer.exe is restarted once and as in the animation above, the pictures folder is again as it was before. Or you can use "Restet Views to Windows Defaults" to reset the default settings. Then all folders are like after a new installation.
Info and download:
- github.com/WinSetView
- Open "Code" at the top of the page and click on "Download.zip", download and unzip.


![[Video] The Suicide Clip That Went Viral On TikTok & Facebook Where Ronnie McNutt Killing Himself With A Gun](https://blogger.googleusercontent.com/img/b/R29vZ2xl/AVvXsEh0WSUxZwxucDgaEEhxo_Qkofv2OJaWZtDNzfRgJKVeoTEGriRYjJOYKcReOLmllP7SHkizDhBT0_i3nwNy2MYth1kj0pOnn73FcRqhDCvp5HW7TApYqsFQiF7UItuIFKKylALXYU1M7Ls/w100/Ronnie-McNutt-Warning-.png)


0 Comments